Routing: Routing Sequences
Routing views are assigned routing sequences that control under what circumstances and to which desks documents will be routed for approval. A routing view can have a single routing sequence for all forms (documents) or separate routing sequences based on creator desks, forms, or both.
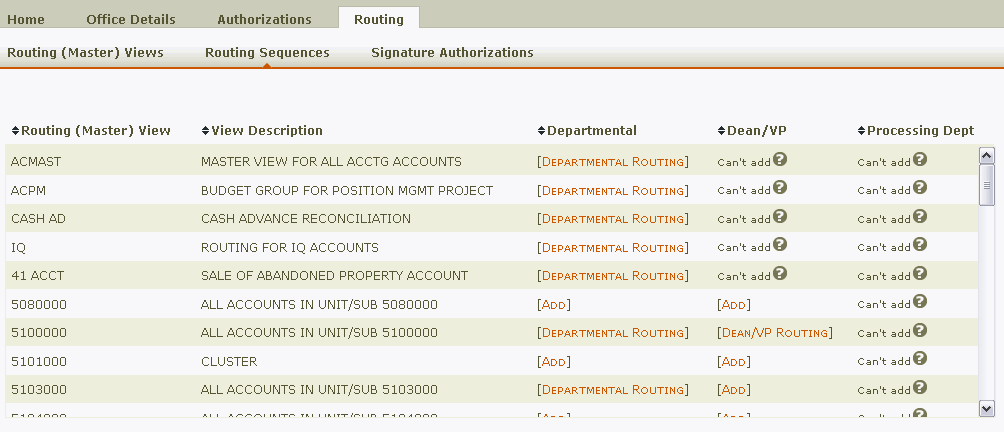
The Routing Sequences page displays details for the routing sequences that belong to an electronic office. While viewing an office, the page can be found under the Routing tab. You can also select Routing Sequences in the Navigation Menu.

The page displays a table containing the following columns:
- Routing (Master) View: The name chosen for a routing view when it was created.
- View Description: The description of a routing view.
- Departmental: Provides a link to view and/or edit departmental routing sequences assigned to the routing view.
- Dean/VP: Provides a link to view the dean/vice president routing sequences assigned to the unit. This type of routing is optional and limited to offices with official units.
- Processing Dept: Provides a link to view processing routing sequences assigned to the routing view. This type of routing is limited to processing units only.
Documents will always complete departmental routing before following dean/vp and/or processing routing.
Departmental Routing
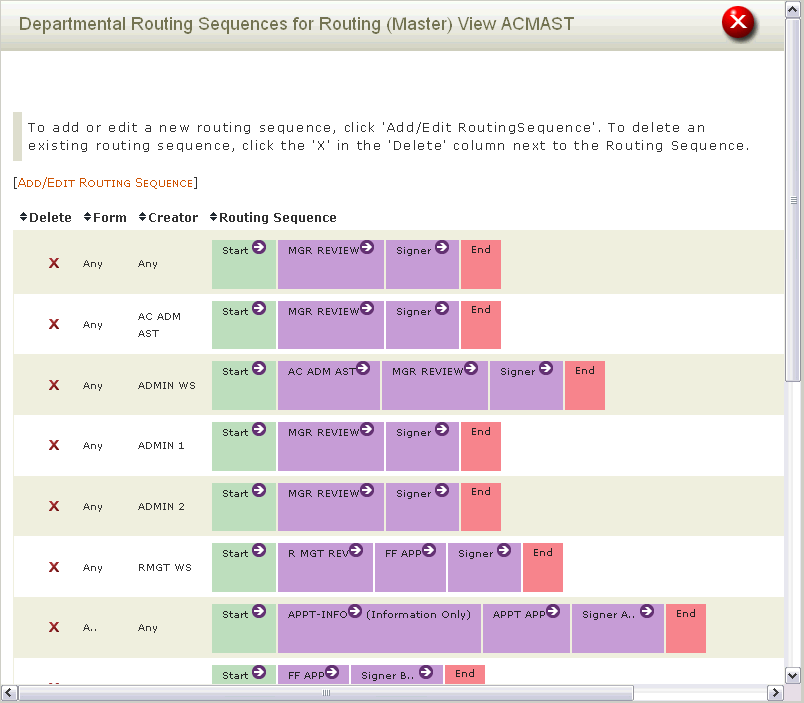
Clicking [DEPARTMENTAL ROUTING] or [ADD] will display the Departmental Routing Sequences box. The Departmental Routing Sequences box allows you to view and update the departmental routing sequences for a routing view.

The Departmental Routing Sequences box displays a table containing the following columns:
- Delete: Provides the option to delete the departmental routing sequence. Only office managers and delegates will see this column.
- Form: The form (document) that the routing sequence is based on.
- Creator: The creator desk that the routing sequence is based on.
- Routing Sequence: The routing sequence that is assigned to the form/creator combination.
When creating routing sequences, you can use an asterisk (*) to include all forms and/or all creator desks. You can also use masking to include all types of a form. For example, "VP." will cause all forms that begin with VP to follow the same routing.
To add a departmental routing sequence:
- Click [ADD/EDIT ROUTING SEQUENCE]. The fields for adding a new routing sequence will appear.
- Type a form (document) in the Form field.
- Type a creator desk in the Creator field.
Hint: If you do not know the desk name, you can use the look-up tool to search for it.
 - Type the desks that documents should go to for approval in the Sequence fields. You can have up to four desks in the routing sequence.*
- Select whether you want the desks in the routing sequence to be Normal (default), Notify, or FYI desks.
- Normal: Approval by a desk assignee is required for the document to continue routing.
- Notify: Desk assignees will receive informational copies in their inboxes, regardless of whether they have previously seen the document.
- FYI: Desk assignees will receive informational copies in their inboxes only if they have not already seen the document.
- Click Update. The new routing sequence will appear at the top of the table.
* The signer desk will always appear at the end of the routing sequences in the table. Signer desks are managed on the Signature Authorizations page under the Routing tab.
To edit a departmental routing sequence:
- Click [ADD/EDIT ROUTING SEQUENCES]. The fields for adding a new routing sequence will appear.
- Click [EDIT AN EXISTING ROUTING SEQUENCE]. The fields for editing an existing routing sequence will appear.
- Select the routing sequence you want to edit from the Form/Creator menu. The current routing will appear in the Sequence fields.
- Make your changes to the desks in the Sequence fields.
- Click Update. The edited routing sequence will be reflected in the table.
To delete a departmental routing sequence:
- Find the routing sequence you want to delete and click the red X in the Delete column. A dialogue box will ask you if you are sure you want to delete.
- Click OK. The routing sequence will no longer appear in the table.
Note: You will not be able to delete a routing sequence if any documents are currently following the routing. Because deleting a departmental routing sequence can have adverse affects on document processing, verify that it is no longer needed for document creation, processing, or account-based routing.
Dean/VP Routing
Dean/VP routing can be established by electronic offices with official units (units ending in "-000") that subunits report to. Dean/VP routing allows those offices to require certain forms (documents) created by subunits of the official unit to route through their offices before they route to the processing unit. Dean/VP routing is optional. Documents will follow dean/vp routing after completing departmental routing.
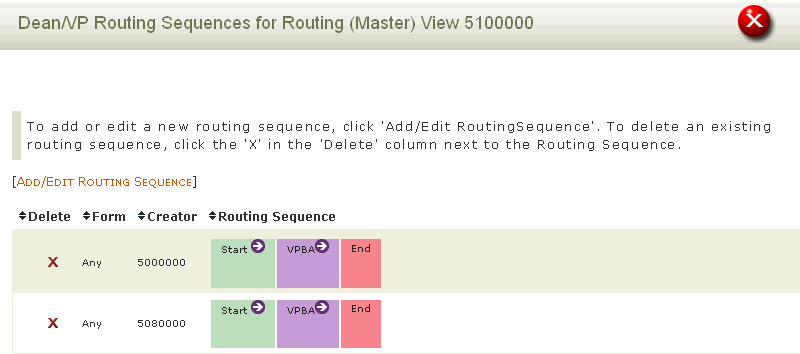
Clicking [DEAN/VP ROUTING] or [ADD] will display the Dean/VP Routing Sequences box.

The Dean/VP Routing Sequences box displays a table containing the following columns:
- Delete: Provides the option to delete the routing sequence. Only office managers and delegates will see this column.
- Form: The form (document) that the routing sequence is based on.
- Creator: The four-digit official unit that the routing sequence is based on.
- Routing Sequence: The routing sequence that is assigned to the form/creator combination.
Dean/VP routing can only be created for official units; therefore, all subunits that report to the official unit will automatically be included in the routing sequence. It is not possible to specify routing for only certain subunits; however, like departmental routing, dean/vp routing sequences can be customized.
To add a dean/vp routing sequence:
- Click [ADD/EDIT ROUTING SEQUENCE]. The fields for adding a new routing sequence will appear.
- Type a form (document) in the Form field.
- Type the four-digit official unit in the Creator field.
- Type the desks that documents should go to for approval in the Sequence fields. You can have up to four desks in the sequence.
Note: If there are forms your office does not need to see, you can type * IGNORE in the first field. - Select whether you want the desks in the routing sequence to be Normal (default), Notify, or FYI desks.
- Normal: Approval by a desk assignee is required for the document to continue routing.
- Notify: Desk assignees will receive informational copies in their inboxes, regardless of whether they have previously seen the document.
- FYI: Desk assignees will receive informational copies in their inboxes only if they have not already seen the document.
- Click Update. The new routing sequence will appear at the top of the table.
To edit a dean/vp routing sequence:
- Click [ADD/EDIT ROUTING SEQUENCES]. The fields for adding a new routing sequence will appear.
- Click [EDIT AN EXISTING ROUTING SEQUENCE]. The fields for editing an existing routing sequence will appear.
- Select the routing sequence you want to edit from the Form/Creator menu. The current routing will appear in the Sequence fields.
- Make your changes to the desks in the Sequence fields.
- Click Update. The edited routing sequence will be reflected in the table.
To delete a dean/vp routing sequence:
- Find the routing sequence you want to delete and click the red X in the Delete column. A dialogue box will ask you if you are sure you want to delete.
- Click OK. The routing sequence will no longer appear in the table.
Note: You will not be able to delete a routing sequence if any documents are currently following the routing.
Processing Department Routing
Processing department routing is only required for processing unit offices. Processing units have final approval over certain documents that have received all departmental approvals. Processing department routing can be set up according to official units or creator desks.
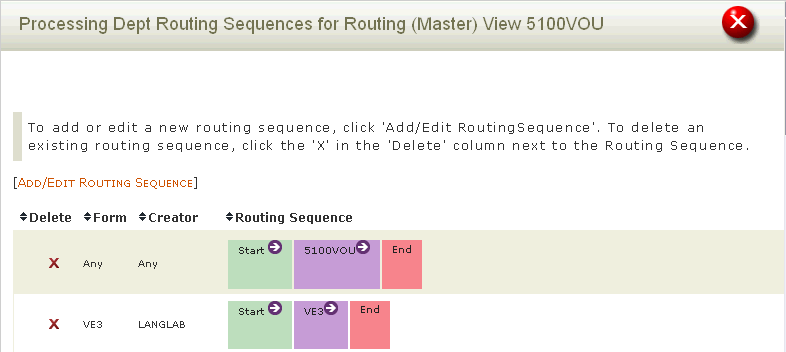
Clicking [PROCESSING DEPT ROUTING] or [ADD] will display the Processing Department Routing Sequences box.

The Processing Department Routing Sequences box displays a table containing the following columns:
- Delete: Provides the option to delete the routing sequence. Only office managers and delegates will see this column.
- Form: The form (document) that the routing sequence is based on.
- Creator: The four-digit official unit code or creator desk.
- Routing Sequence: The routing sequence that is assigned to the form/creator combination.
To add a processing department routing sequence:
- Click [ADD/EDIT ROUTING SEQUENCE]. The fields for adding a new routing sequence will appear.
- Type a form (document) in the Form field.
- Type a four-digit official unit or creator desk in the Creator field.
- Type the desks that documents should go to for approval in the Sequence fields. You can have up to four desks in the sequence.
Note: If there are forms your office does not need to see, you can type * IGNORE in the first field. - Select whether you want the desks in the routing sequence to be Normal (default), Notify, or FYI desks.
- Normal: Approval by a desk assignee is required for the document to continue routing.
- Notify: Desk assignees will receive informational copies in their inboxes, regardless of whether they have previously seen the document.
- FYI: Desk assignees will receive informational copies in their inboxes only if they have not already seen the document.
- Click Update. The new routing sequence will appear at the top of the table.
To edit a processing department routing sequence:
- Click [ADD/EDIT ROUTING SEQUENCES]. The fields for adding a new routing sequence will appear.
- Click [EDIT AN EXISTING ROUTING SEQUENCE]. The fields for editing an existing routing sequence will appear.
- Select the routing sequence you want to edit from the Form/Creator menu. The current routing will appear in the Sequence fields.
- Make your changes to the desks in the Sequence fields.
- Click Update. The edited routing sequence will be reflected in the table.
To delete a processing department routing sequence:
- Find the routing sequence you want to delete and click the red X in the Delete column. A dialogue box will ask you if you are sure you want to delete.
- Click OK. The routing sequence will no longer appear in the table.
Note: You will not be able to delete a routing sequence if any documents are currently following the routing.