Create a UT Market Receipt
This page is used by departments who have ordered goods through UT Market and had them delivered directly to the department instead of Central Receiving. Receipts created on this page can be edited for three days in the event that the quantities need to be adjusted. After three days, the receipt is finalized and can no longer be edited nor deleted. Finalized receipts authorize payment to the supplier upon receipt of an invoice.
![]()
To create a new receipt for a purchase order, type the PO number in the PO Number box and click Create Receipt for PO.
If there are other receipts for the PO, the View Other Receipts On This PO link will be available. Note: This link goes to the Search Receipts page without saving any changes on the current screen.
![]()
Receipt Information

The following fields are pre-populated on a newly created receipt:
- PO Number is the purchase order number for the order. Click the link in the PO number field to go to the PO Details page for the order.
- Dept Req Number is the departmental requisition number for the order, a departmentally-assigned number entered by the buyer when the requisition document was created.
- Order Total is the total amount of the purchase order.
The following fields must be entered by the receipt creator:
- Received UT EID is the UT EID of the person who accepted the items. This person is responsible for verifying that the packing slip is correct and that the items are in good condition. Use the lookup tool
 to search for a valid UT EID.
 - Received Date is the date that the items were accepted. Enter dates in MM/DD/YYYY format. The calendar tool
 can also be used to select a date.
Line Items
The line items section lists the items ordered in the purchase order.
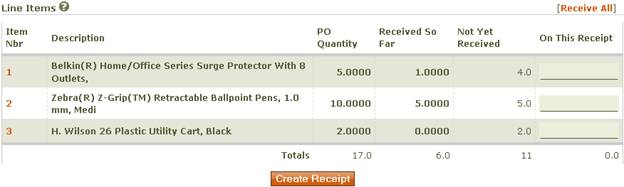
The Item Nbr column displays the line item number of the item as it appeared on the purchase order. Click the item number to display purchase order details about the item in a new window.
The Description column displays the line item description from the purchase order.
The PO Quantity column displays the quantity ordered from the purchase order.
The Received So Far column displays the quantity of that line item that has been received previously.
The Not Yet Received column displays the quantity of the line item that has not yet been received. This can be a negative number if the quantity received so far exceeds the quantity ordered.
Use the On This Receipt column to indicate the quantity to be received on this receipt. Use the Receive All link above the column to populate all rows with the quantity not yet received. This action will completely receive the remainder of the items ordered. The quantities will remain modifiable until the Update Receipt button is clicked.
Click Create Receipt to complete the process of creating a new receipt.