Create a New Scholarship, Fellowship, or Cash Prize
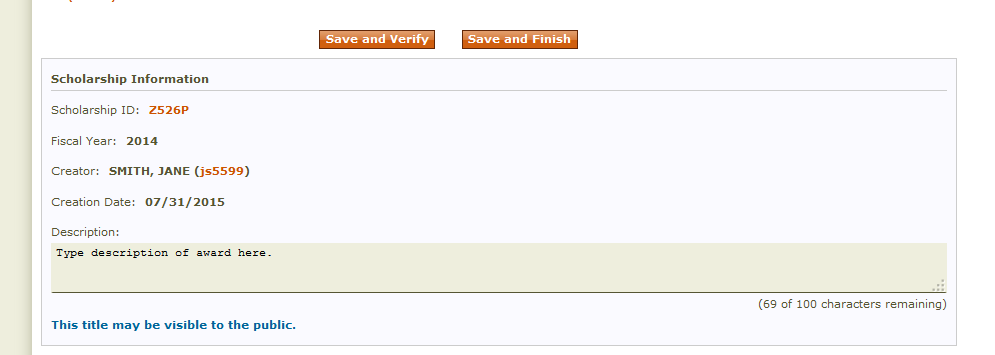
Creating a new Scholarship/Fellowship document begins from the Awards Home tab or the Create tab. Save progress at any time during the document creation process by selecting Save and Verify at the top or bottom of the page.
Getting Started with Create a New Scholarship/Fellowship or Cash Prize
- Start from the Awards Home tab or Create tab.
- From the Awards Home tab, select Create a new award.
- From the Create tab, the document creator will be automatically directed to the first step in the creation process.
- Verify that the payment meets the conditions listed on the screen.
- If the payment meets the conditions, select I, [name] confirm that this payment meets the above conditions.
- If the payment does not meet the conditions listed on the screen, select This payment does not meet the above conditions. Now what? This link will display a pop-up window, which will direct you to the appropriate service for proper payment method.
- After confirming that the scholarship/fellowship or cash prize meets the listed conditions:
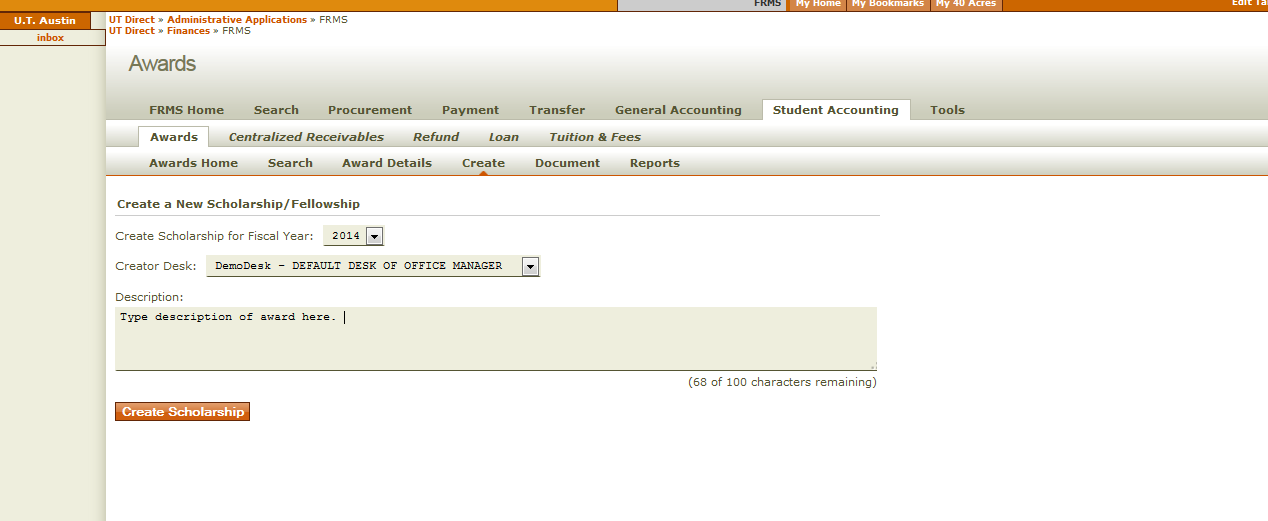
- Select the fiscal year in which to create the award.
Note: If the correct fiscal year is not selected after creating the scholarship/fellowship or cash prize, the document must be deleted and a new document must be created. - Select the appropriate creator desk.
- Profiling a Desk/View for FRMS
Use the *DEFINE YP2 command to profile a desk/view so that it always appears as the first desk/view when selecting a creator desk for an FRMS document. - Note: If the user’s current or profiled desk/view is not authorized for the command, or if the user is not authorized for the desk/view that is profiled, it will not appear in the creator desk list.
- Profiling a Desk/View for FRMS
- Enter a description for the document.
- Click Create Scholarship.
- Select the fiscal year in which to create the award.
- Scholarship Infromation Type a description for the award document in the Description free-form field. The Description field allows up to 100 characters.
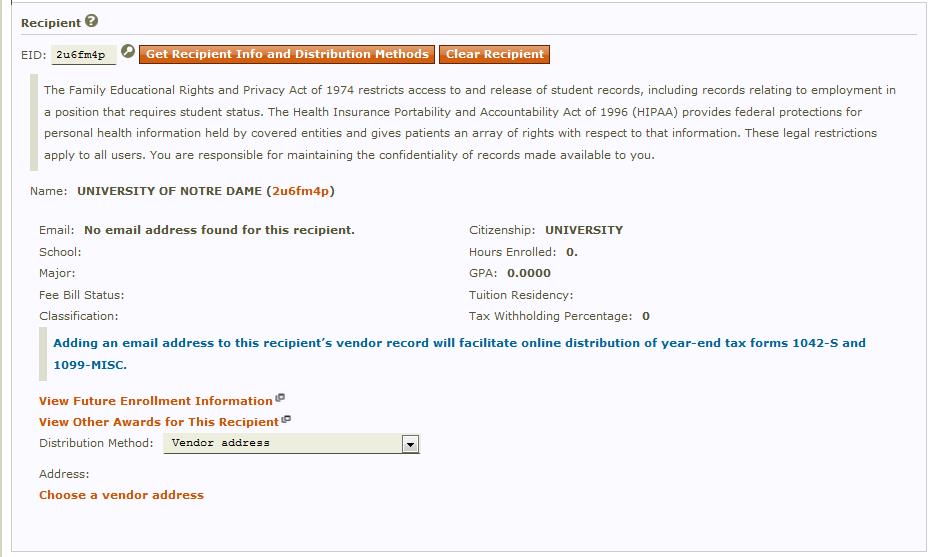
- Recipient
- Type the UT EID of the recipient of the award.
- Select Get Recipient Info and Distribution Methods to add the recipient to the document. To remove a selected recipient, select Clear Recipient and the recipient will be removed from the document.
- Distribution Method: Select the preferred distribution method from the drop-down menu. If direct deposit is on file, it will be the default method.
-
Tax Withholding Percentage: The tax withholding percentage displayed here always reflects the current tax withholding rate for the recipient, regardless of the tax rate displayed at the time the award document final approved or when funds were disbursed.

- Accounts
- Type the account number that will be used to pay the recipient.
- Type the amount to pay.
- Click Add Account. To enter more than one account number, repeat steps above for each additional account to be used to pay the recipient. Tp remove an account from the document go to the Remove column on the right side of the account section, locate the line on which the account is listed, and click Delete.
- Payment Schedule
Payment may be scheduled automatically with a scheduler or manually. - Automatically schedule payments
- Select Use Scheduler.
- All the that have been added to the document will be selected.
- Select the frequency of payments (monthly or semesterly).
- Monthly Payments
- The start date defaults to the current date. You may change the start date by manually typing a date in MM/DD/YYYY format or by clicking the calendar icon to the right of the start date field and selecting a start date.
- From the drop-down menu, select the number of months for which you want the payments to occur. The highest number available will create payments through the end of the fiscal year. For example, if you create a scholarship in September, 12 payments will be available because twelve months remain in the fiscal year. However, if you create an award in May, only four payments will be available, because four months remain in the fiscal year. After the payments are created, you may manually make any adjustments necessary to amounts, payment dates, and financial aid semesters.
- Click Create Monthly Payments.
- Semesterly Payments
- The start date field defaults to the current date. You may change the start date by manually typing a date in MM/DD/YYYY format or by clicking the calendar icon to the right of the start date field and selecting a start date.
- Select the semesters in which you wan the payments to occur.
- Click Create Monthly Payments.
- Monthly Payments
- Manually schedule payments
- Select the appropriate account from the drop-down menu.
- Type the amount to be paid from the selected account.
- Type the date (MM/DD/YYYY) the payment is to be made.
- Select the semester for which the award is to be applied to the recipient’s financial aid.
- Click Add Payment.
- To add additional payments to the Payment Schedule, repeat steps 1-5. To remove a payment from the Payment Schedule section, locate the line on which the payment is listed, and click Delete.
- Check the Status column to verify that the status of each payment is correct. You can change the status of the payment by selecting Held or Not Held from the drop-down menu. If desired, you may Hold all or Release all payments by clicking the links just above the Status column.
- Purpose of Payment
- Is this payment for a post-doctoral fellowship? Select the appropriate radio button.
- Yes
- No
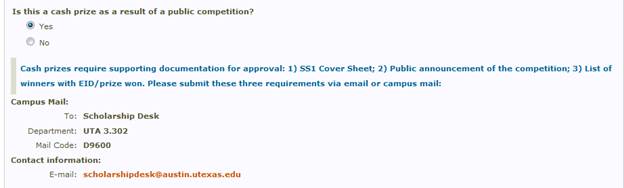
- Is this a cash prize as a result of a public competition? Select the appropriate radio button.
- Yes
- No
- Are these funds to help support this non-U.S. resident recipient while outside the United States? This question will appear if the recipient is a non-U.S. resident. Select the appropriate radial button.
- Yes
- No
- This award is based on (choose at least one):
This question will appear if the award is not a cash prize. Check all appropriate boxes. - Financial Need
- Academic Merit
- Other – If Other, complete the Other Reason field.
- Is this award for study abroad?
This question will appear if the award is not a cash prize. Select the appropriate radio button. If the award is for study aboard, but it is not known whether it is for course credit or independent study, contact the recipient or the International Office. - Yes, for course credit
- Yes, for independent study
- No – If no, complete the Travel section.
- Travel – Complete this section only if the award is not for study abroad.
- Are these funds for travel (not including study abroad)?
- Yes – If yes, complete the follow-up questions.
- Destination: Use the search icon to view the destination list and obtain the destination code for the place of travel.
- Purpose (select one):
- Attend meeting, conference, or other educational event
- Perform research activities
- Site or field visit
- Present original research paper
- Other – If Other, complete the Other Reason field. The Other Reason field allows up to 250 characters.
- Registration Requirements
- Must the recipient be registered to receive this award? Select the appropriate radio button. If the recipient must receive the funds during intersession, select No when answering this question. Every payment will be audited to make sure the recipient is registered at the required level. You may change this requirement later, if necessary, by creating a Modify document.
- Yes, full time - If yes, answer the question Must the recipient be registered for the first payment?
- Yes, part time - If yes, select if the recipient must be registered for the first payment. If yes, answer the question Must the recipient be registered for the first payment?
- Yes, for at least one class - If yes, answer the question Must the recipient be registered for the first payment?
- No
- Must the recipient be registered for the first payment? Select the appropriate radio button.
- If the answer to the registration question above is Yes select the correct answer to this question. If you want the recipient to receive the funds without requiring registration, select No
- Scholarship Comments – If appropriate, add a scholarship comment for this document in the Scholarship Comments field. The Scholarship Comments field allows up to 500 characters.
- Save progress at any time during the document creation process by selecting Save and Verify at the top or bottom of the page. Select Save and Finish to route the document forward for approval.
- The final step in the process of creating a new award is to review the document. When the document is correct, click Approve Document in the routing widget, and the document will route to the next desk in the routing path.
Note: If Vendor address is selected in the Distribution Method drop-down menu, the Choose a vendor address link appears below the drop-down menu. After selecting Choose a vendor address, all available addresses display in a pop-up window. Mark the radio button next to the appropriate address. There is a maximum of 144 addresses that can be displayed.

Note: If using an endowment 30-account to fund any portion of the award, click the Donor Criteria link in the Endowment Details column to view more information. This message appears: By approving this document, you are certifying that this recipient meets the donor criteria listed in the Donor Criteria links of the 30-account(s) listed above.
If the award is for a cash prize this message will display:
If the award is not for a cash prize, additional questions will appear.
Note: If the traveler's destination is not listed, send an e-mail to the Travel section at oa.travel@austin.utexas.edu. Request that the destination be added to the system and include the city, county, state, and country.
Note: If payments are scheduled for intersession times when classes are not in session, requiring any level of registration will mean that the payment will not go out because the student is not registered on the date of payment.