Authorizations: Desks
Desks are groups of people that need to be in a routing path (account or nonaccount based) or that need access to units and/or accounts in order to process account-based documents. By linking a desk to an authorization view, electronic office managers can grant individuals on the desk access to the units and/or accounts that are in the authorization view.
The Desks page displays details for the desks that belong to an electronic office. While viewing an office, the page can be found under the Authorizations tab. You can also select Desks in the Navigation Menu.
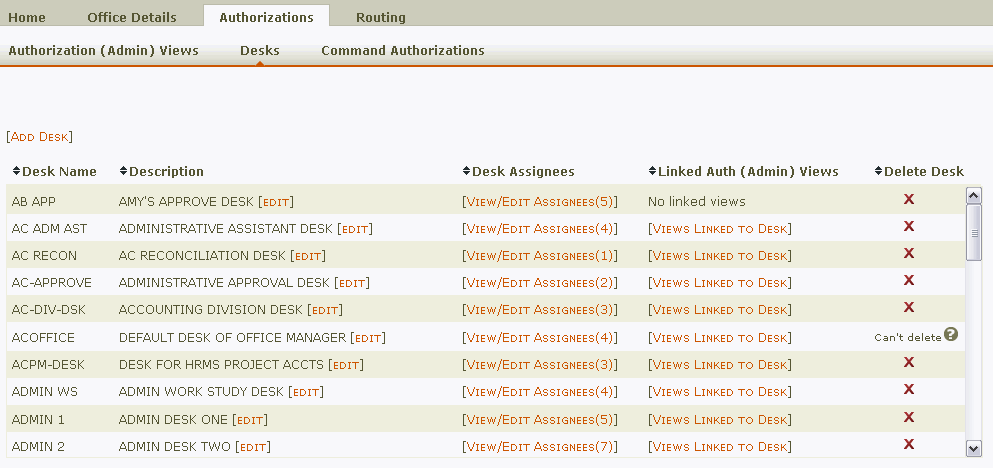
The page displays a table containing the following columns:
- Desk Name: The name chosen for a desk when it was created. Once a desk is created, it cannot be renamed.
- Description: The description of a desk. A description is required, but it can be changed at any time.
- Desk Assignees: Provides a link to view the individuals assigned to a desk.
- Linked Auth (Admin) Views: Provides a link to view the authorization views a desk is linked to.
- Delete Desk: the option to delete the desk. Only office managers and delegates will see this column.
Note: The desk that is named after the electronic office will not have a delete option. This desk was automatically created when the electronic office was created and cannot be deleted.
Note: For nonaccount-based routing, desks do not need to be linked to an authorization view.
Create/Delete Desks
To create a new desk:
- Click [ADD DESK]. An entry line will appear above the table.
- Type a name for the new desk in the Name field.
Note: The desk name must be unique across all electronic offices. A red failure message will be displayed if you attempt to add a name that already exists or that contains restricted characters. Only the following special characters are allowed in a desk name: ampersand (&), dollar sign ($), single quote ('), hyphen (-), colon (:), asterisk (*), period (.), forward slash (/), and comma (,). - Type a description for the new desk in the Description field.
- Click Add. The new desk will appear at the top of the table.
To delete a desk:
- Find the desk you want to delete and click the red X in the Delete Desk column. A dialogue box will ask you if you are sure you want to delete.
- Click OK. The desk will no longer appear in the table.
Note: Because deleting a desk can have adverse affects on document processing, verify that it is no longer needed for document creation, processing, or routing (account and nonaccount based). Also make sure that no documents that were created on the desk are in the middle of routing.
Once a desk has been created, it cannot be renamed. However, the description can be updated at any time. To update the description:
- Click [EDIT] next to the description to unlock the field.
- Type the new description.
- Click Save. The updated description will appear.
Desk Assignees
Clicking [VIEW/EDIT ASSIGNEES] will display the Desk Assignees box. The Desk Assignees box allows you to view and update the individuals assigned to the desk. Desks are limited to no more than 40 assignees.
Note: If no one is assigned to the desk, [ADD ASSIGNEES] will appear.
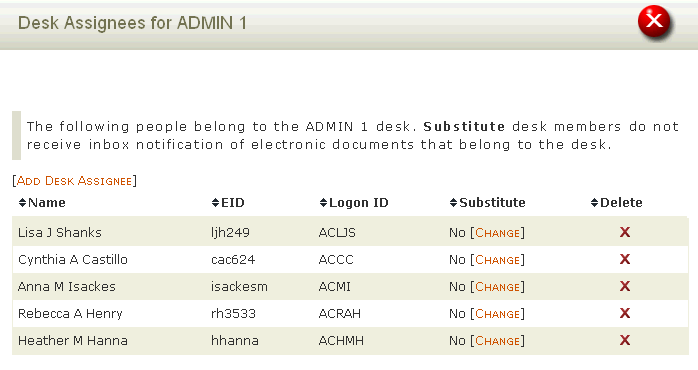
The Desk Assignees box displays a table containing the following columns:
- Name: The name of the assignee.
- EID: The UT EID of the assignee.
- Logon ID: The mainframe logon ID of the assignee.
- Substitute: Indicates whether the assignee is a substitute.
- Delete: Provides the option to remove the assignee from the desk. Only office managers and delegates will see this column.
To add someone to a desk:
- Click [ADD DESK ASSIGNEE].
Note: University affiliates are eligible for administrative desk membership in EOM if they have the "Official Visitor" or "Treat Like an Employee" privilege assigned to them in HRMS. - Type the individual's UT EID in the EID field.
Hint: If you don't know the EID, you can use the look-up tool to search for it.
 - If you want the individual to be a substitute, mark the Substitute check box.
- Click Add. The new assignee will appear at the top of the table.
Note: If you need to change an existing assignee to or from a substitute, click [CHANGE] in the Substitute column.
To remove someone from a desk:
- Find the individual you want to remove from the desk and click the red X in the Delete column. A dialogue box will ask you if you are sure you want to delete.
- Click OK. The individual will no longer appear as a desk assignee.
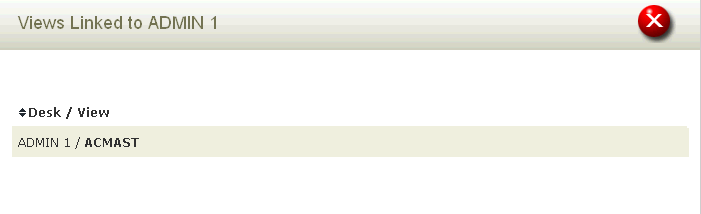
Views Linked to Desk
Clicking [VIEWS LINKED TO DESK] displays the Views Linked box which lists the authorization views that the desk is linked to. You cannot update linked desks and authorization views here or from the Desks page; you may use the Authorization (Admin) Views page or the Command Authorizations page.